Although you can uninstall programs from the app drop-down list on Windows 10, still Control Panel is the most preferred way to add/remove new programs. Let’s admit, there are times when we all have wanted to hide certain items from the Control Panel. For example, if you have a shared PC, then you won’t want others to see what software you use. Similarly, Control Panel, if landed in the wrong hand can invite lots of troubles. So, if you want to hide items from the Control Panel in Windows, then you are reading the right article.
Hide Items from the Control Panel in Windows
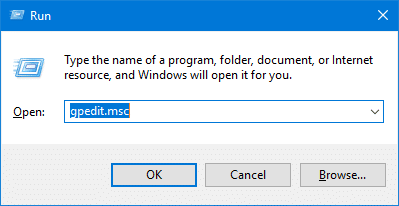
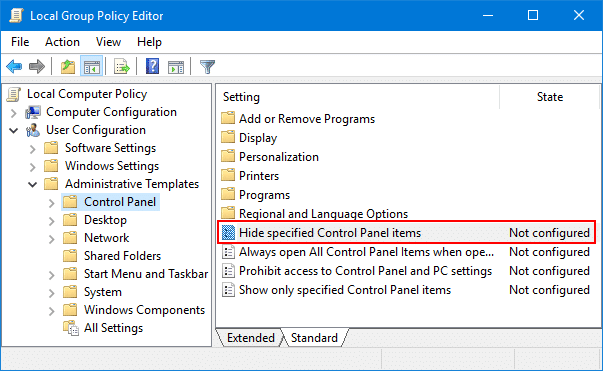
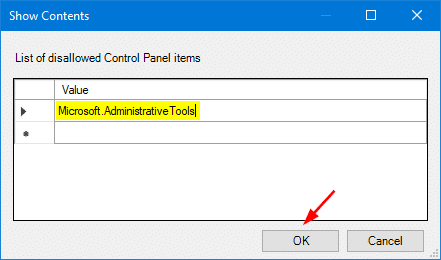
In this article, we are going to share a way to stop others from changing certain settings on the Control Panel. So, let’s check out how to hide Control Panel Settings on Windows 10 operating system. Step 1. First of all, open Run dialog box on your Windows 10 operating system. Step 2. On the RUN dialog box, enter ‘gpedit.msc‘ and hit enter. Step 3. This will open the Local Group Policy Editor. There you need to browse to the User Configuration > Administrative Templates > Control Panel. There double click on the ‘Hide specified control panel items’ from the right-hand side panel. Step 4. In the next window, you need to enable the ‘Hide Specified Control Panel Items’ and click on the ‘Show’ button near the List of disallowed control panel items. Step 5. In the next window, you need to add the Canonical name of the Control Panel item which you want to hide. Towards the end of the article, we have shared a list of Canonical name for any specific control panel item. Step 6. Once added, close the opened window and restart your computer.
So, this article is all about How to Hide Items from the Control Panel in Windows. By following the method given above, you can easily hide any items from the Control Panel. I hope this article helped you! Share it with your friends also.


